Even before the user reads this page,the user is strongly recommended to read the help on the various features of the Lobster application.Otherwise,the user may not completely understand the contents of this page.To jump to the page describing the features of the Lobster application.Click Here
Interface of the Lobster application comprises of all the big features of the Lobster application which work in conjuction with each other to implement the 'Interface' of the Lobster application.Interface of the Lobster application comprises of eight levels where there is one big feature on each level which can be enabled or disabled to create 'Infinite Possibilities' from already present features of the Lobster application.The eight features which reside on the eight levels are Filters,QRGB,Patterns,Pattern Styles,Filter Styles,Gradients,Edit Modes, and 3D Effect.The Interface in one single line means Filters and/or QRGB and/or Pattern and/or Pattern Style and/or Filter Style and/or Gradient and/or Edit Mode and/or 3D Effect.What actually it means is that every big feature can be included or excluded while applying the filter which in turn will create a different or new effect from the features already present in the Lobster application.Any Filter,Color from QRGB,Pattern,Pattern Style,Filter Style,Gradient or Gradient technique,Edit Mode and 3D Technique can be used and they are further highly customizable providing more options while applying the filter.User should keep in mind that by default the user will be only able to apply the filter and all the other features will have to be enabled to include them while applying the filter.User will be shown step by step the results through snapshots how the 'Effect' changes as level increases as the QRGB is added to Filter and then QRGB and Patterns are added to Filter,and so on till the last level/feature is reached where the 3D Effect is also enabled along with QRGB,Pattern,Pattern Style,Filter Style,Gradient and Edit Mode.Though the most important thing to remember is that the user can disable or enable any feature among all the eight features of this Interface.Following examples will clear the complexity associated with this Interface and will also show how to enable and disable the various features on the various levels while using this Interface.
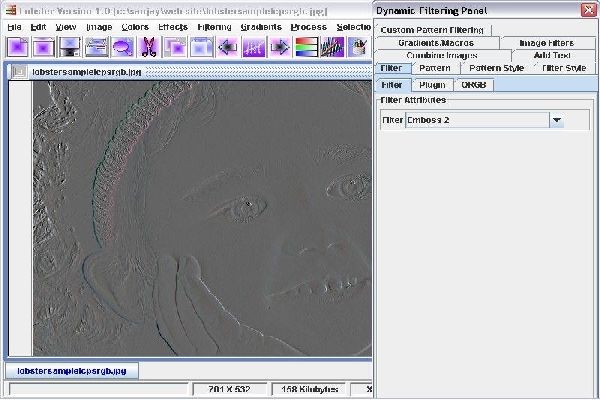
[Example 1] Following snapshot shows the Filter 'Emboss' applied to the image while all the other features are disabled by default.This is the default level which usually the user will use to just test the filters of the Lobster application and therefore the user can see the filter in its 'Original Form' without any 'Levels of complexity' added to the filter.
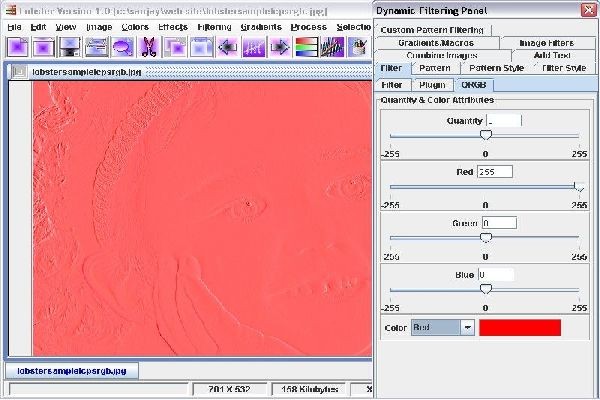
[Example 2] Following snapshot shows the QRGB feature applied to the Filter 'Emboss'.Red Color is chosen from the QRGB panel from the 'Filter' tab from the Filter Dialogbox which is visible in this snapshot.The most important thing to note is that if the user wants to view the 'Original Form' of any filter,then the 'Black' color should be chosen by the user from the Color Combobox in the QRGB panel of the 'Filter' tab which the user may have changed for some other color like Red or Green.Also,if the user wants to disable the QRGB feature while applying the filter then also the user should choose the Black color from the Color combobox from the QRGB panel of the 'Filter' tab from the Filter Dialogbox or Dynamic Filtering Panel.This is the level 2 of complexity where the Filter is combined with the QRGB feature i.e.,Filter+QRGB.
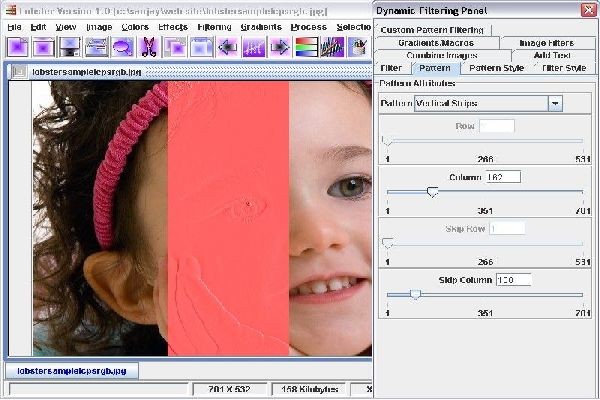
[Example 3] Following snapshot shows the Filter 'Emboss' combined with QRGB and Patterns feature.Red color is chosen from the QRGB panel of the 'Filter' tab of the Filter Dialogbox or Dynamic Filtering Panel.The most important thing to note is that by default the Patterns combobox of the 'Pattern' tab of the Filter Dialogbox was having the 'None' as the default Pattern which was changed to the 'Vertical Strip' Pattern to enable the Patterns feature in this example.So,if the user wants to disable the Patterns feature,then the user should choose the 'None' Pattern from the Patterns combobox from the 'Pattern' tab of the Filter Dialogbox.'Pattern' tab is also visible in the following snapshot.This is the level 3 of complexity where the Filter is combined with the QRGB and Patterns feature i.e.,Filter+QRGB+Pattern.
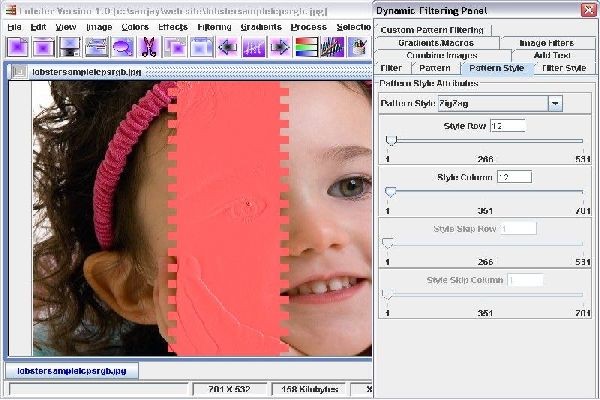
[Example 4] Following snapshot shows the Filter 'Emboss' combined with QRGB,Pattern,and Pattern Style feature.Red color is chosen from the QRGB panel of the 'Filter' tab of the Filter Dialogbox or Dynamic Filtering Panel.Pattern chosen is 'Vertical Strip' from the 'Pattern' tab.The most important thing to note is that by default the Pattern Style combobox of the 'Pattern Style' tab of the Filter Dialogbox was having the 'None' as the default Pattern Style which was changed to the 'Zigzag' Pattern Style to enable the Pattern Style feature in this example.So,if the user wants to disable the Pattern Style feature,then the user should choose the 'None' Pattern Style from the Pattern Style combobox from the 'Pattern Style' tab of the Filter Dialogbox.'Pattern Style' tab is also visible in the following snapshot.This is the level 4 of complexity where the Filter is combined with the QRGB,Pattern and Pattern Style feature i.e.,Filter+QRGB+Pattern+Pattern Style.
[Example 5] Following snapshot shows the Filter 'Emboss' combined with QRGB,Pattern,Pattern Style and Filter Style feature.Red color is chosen from the QRGB panel of the 'Filter' tab.Pattern chosen is 'Vertical Strip' from the 'Patterns' tab and Pattern Style is chosen is 'Zigzag' from the 'Pattern Style' tab.The most important thing to note is that by default the Filter Style combobox of the 'Filter Style' tab of the Filter Dialogbox was having the 'None' as the default Filter Style which was changed to the 'Double Filter Style' to enable the Filter Style feature in this example.So,if the user wants to disable the Filter Style feature,then the user should choose the 'None' Filter Style from the Filter Style combobox from the 'Filter Style' tab of the Filter Dialogbox.Because of the 'Double Filter Style',first filter will be filled into the 'Vertical Strip' Pattern while the second filter is filled into the 'Skip Area'. 'Filter Style' tab is also visible in the following snapshot.This is the level 5 of complexity where the Filter is combined with the QRGB,Pattern,Pattern Style and Filter Style feature i.e.,Filter+QRGB+Pattern+Pattern Style+Filter Style.

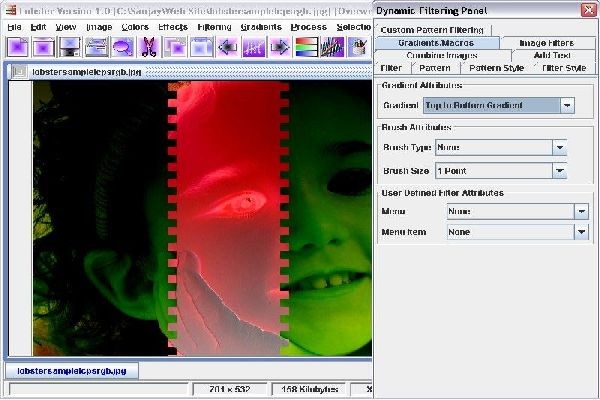
[Example 6] Following snapshot shows the Filter 'Emboss' combined with QRGB,Pattern,Pattern Style and Filter Style feature.Red color is chosen from the QRGB panel of the 'Filter' tab.Pattern chosen is 'Vertical Strip' from the 'Patterns' tab and Pattern Style is chosen is 'Zigzag' from the 'Pattern Style' tab.The most important thing to note is that by default the Gradient combobox of the 'Gradient' tab of the Filter Dialogbox was having the 'None' as the default Gradient which was changed to the 'Top to Bottom Gradient' to enable the Gradient feature in this example.So,if the user wants to disable the Gradient feature,then the user should choose the 'None' Gradient from the Gradient combobox from the 'Gradient' tab of the Filter Dialogbox.This is the level 6 of complexity where the Filter is combined with the QRGB,Pattern,Pattern Style,Filter Style and Gradient feature i.e.,Filter+QRGB+Pattern+Pattern Style+Filter Style+Gradient.
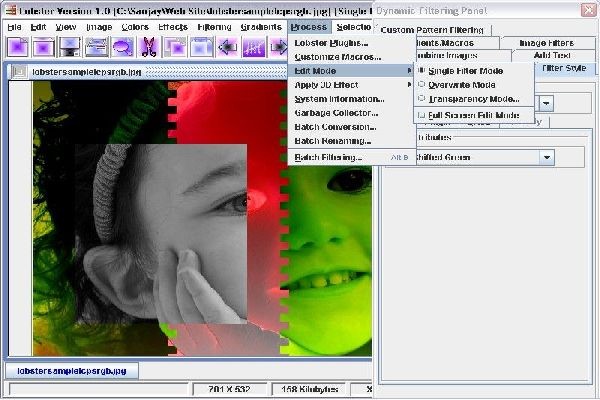
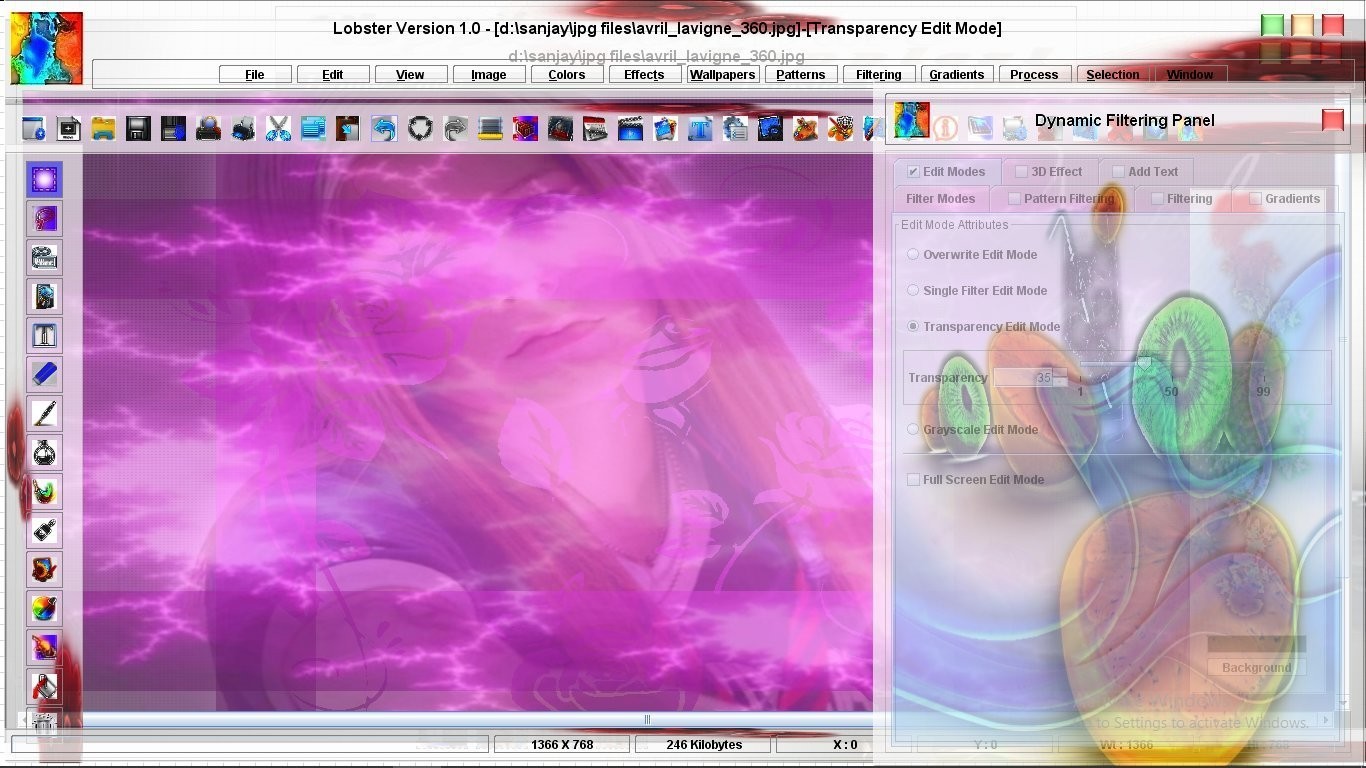
[Example 7] Following snapshot shows the Filter 'Emboss' combined with QRGB,Pattern,Pattern Style,Filter Style,Gradient and Edit Mode feature.Red color is chosen from the QRGB panel of the 'Filter' tab.Pattern chosen is 'Vertical Strip' from the 'Patterns' tab and Pattern Style is chosen is 'Zigzag' from the 'Pattern Style' tab.Double Filter Style is chosen from the 'Filter Style' tab used to combine two filters.The most important thing to note is that by default the 'Overwrite Mode' is the Edit Mode which will merge the contents of the current Filter with the contents of the image.For this example,'Single Filter Mode' is chosen as the Edit Mode which will not overwrite the contents of the 'Previous Layer' in the image so the 'Current Layer' will 'Skip' overwriting the 'Previous Layer' of the image.Following snapshot shows the 'Single Filter Mode' chosen as the 'Current Edit Mode'.User should use the default 'Overwrite Mode' to disable the other Edit Modes like Single Filter Edit Mode and Transparency Edit Mode.This is the level 7 of complexity where the Filter is combined with the QRGB,Pattern,Pattern Style,Filter Style,Gradient and Edit Mode feature i.e.,Filter+QRGB+Pattern+Pattern Style+Filter Style+Gradient+Edit Mode.User can see that the Layer having 'Grayscale' filter is not overwritten by the filter having QRGB+Pattern+Pattern Style+Filter Style+Gradient+Edit Mode.
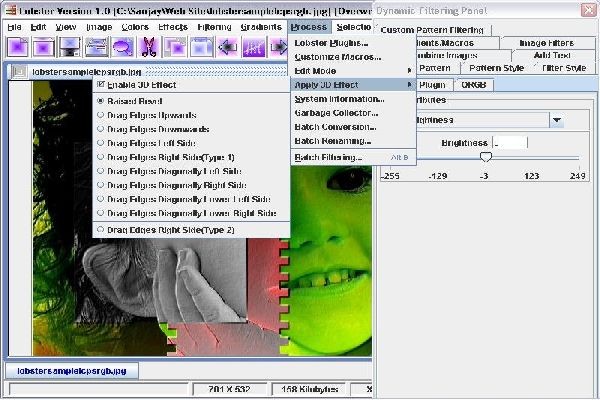
[Example 8] Following snapshot shows the Filter 'Emboss' combined with QRGB,Pattern,Pattern Style,Filter Style,Gradient,Edit Mode and 3D Effect feature.Red color is chosen from the QRGB panel of the 'Filter' tab.Pattern chosen is 'Vertical Strip' from the 'Patterns' tab and Pattern Style is chosen is 'Zigzag' from the 'Pattern Style' tab.Double Filter Style is chosen from the 'Filter Style' tab used to combine two filters.For this example,'Single Filter Mode' is chosen as the Edit Mode which will not overwrite the contents of the 'Previous Layer' in the image so the 'Current Layer' will 'Skip' overwriting the 'Previous Layer' of the image.In this example,3D Effect is also enabled which is visible in the following snapshot to add the 3D Effect to the filter.This is the level 8 of complexity where the Filter is combined with the QRGB,Pattern,Pattern Style,Filter Style,Gradient and Edit Mode feature i.e.,Filter+QRGB+Pattern+Pattern Style+Filter Style+Gradient+Edit Mode+3D Effect.
All the above examples where shown only to explain how does the 'Effect' changes as the 'Level of Complexity' increases when Filter is added to QRGB first,QRGB & Pattern,QRGB,Pattern and Pattern Style and so on.But,it is also possible to the user to skip a 'Feature(s)' at any 'Level(s)' to get good results by combining the various 'Features' at various 'Levels'.User should keep in mind that there are 8 'Features' at 8 'Levels' and they can be combined by including certain features or excluding certain features while applying the filter.Following section shows how certain features can be excluded or included to get different 'Effect' from the same filter.
[Example 9] Following snapshot shows the Filter combined with FilterStyle and Pattern,QRGB,Pattern Style,Edit Mode,Gradient and 3D Effect are not included while applying the Filter.The Filter is 'Add Noise' and FilterStyle is 'Brightness Filtering' with 'Leaves.jpg' image.User should keep in mind that the color 'Black' is chosen from the QRGB panel of the 'Filter' tab to disable the QRGB feature and the Pattern Style,Filter Style and Gradient are set to 'None' to exclude these features while applying the filter.Also,Edit Mode is set to the Default 'Overwrite Mode' to exclude the Edit Mode feature while applying the filter and 3D Effect is is disable from the 'Process' menu.In this example,two features from different levels are combined to get a new 'Effect' i.e.,Filter+FilterStyle.
[Example 10] Following snapshot shows the Filter combined with Pattern and QRGB,Pattern Style,Filter Style,Edit Mode,Gradient and 3D Effect are not included while applying the Filter.The Filter is 'Combine Images' and Pattern is 'Horizontal Strips' which combines the image of 'Girl' with the Vector Graphics image having 'Medusa' effect in it.'Interlace' effect is created because the 'Row' and 'Skip Row' fields both have 1 pixel entered while using the Pattern 'Horizontal Strips'.So,only one single row is extracted and combined from both images creating a 'Interlace' effect.User should keep in mind that the color 'Black' is chosen from the QRGB panel of the 'Filter' tab to disable the QRGB feature and the Pattern Style,Filter Style and Gradient are set to 'None' to exclude these features while applying the filter.Also,Edit Mode is set to the Default 'Overwrite Mode' to exclude the Edit Mode feature while applying the filter and 3D Effect is is disable from the 'Process' menu.In this example,two features from different levels are combined to get a new 'Effect' i.e.,Filter+Pattern.User can also see 'Medusa.jpg' in the 'Combine Images' tab in the Dynamic Filtering Panel.
[Example 11] Following snapshot shows the Filter combined with Pattern and 3D Effect and QRGB,Pattern Style,Filter Style,Edit Mode and Gradient are not included while applying the Filter.The Filter is 'Red Channel' and Pattern is 'Bottom Graph' and 3D Effect is enable from the 'Process' menu.Each line of the Bottom Graph seems to be swollen because the '3D Technique' used is 'Drag edges to the right side(Type 1)' which will create a 4 pixel elevation around the edges of any 2D Graphics.User should keep in mind that the color 'Black' is chosen from the QRGB panel of the 'Filter' tab to disable the QRGB feature and the Pattern Style,Filter Style and Gradient are set to 'None' to exclude these features while applying the filter.Also,Edit Mode is set to the Default 'Overwrite Mode' to exclude the Edit Mode feature while applying the filter.In this example,three features from different levels are combined to get a new 'Effect' i.e.,Filter+Pattern+3D Effect.
[Example 12] Following snapshot shows the Filter combined with Pattern,Filter Style and Gradient and QRGB,Pattern Style,Edit Mode and 3D Effect are not included while applying the Filter.Because this example is using Double Filter Style,the first filter is 'Grayscale' and second filter is 'Duatone' which is chosen from the 'Filter Style' tab.Gradient is 'Rectangular Gradient'.Because the QRGB panel is used to manipulate the Gradient therefore in both filters the Quantity,Red,Green and Blue is set to 0 so that the Gradient ranges from Darker pixels to Brighter pixels.The Pattern Style is set to 'None' to exclude it while applying the filter.Also,Edit Mode is set to the Default 'Overwrite Mode' to exclude the Edit Mode feature and 3D Effect is disable from the 'Process' menu while applying the filter.In this example,four features from different levels are combined to get a new 'Effect' i.e.,Filter+Pattern+Filter Style+Gradient.The most important thing is that because this filter is using Double Filter Style both the Gradients(one in the Pattern and other in the Skip Area) maintain their own characteristics and therefore do not create a distortion.
[Example 13] Following snapshot shows the Filter combined with Pattern,Pattern Style and Gradient and QRGB,Filter Style,Edit Mode and 3D Effect are not included while applying the Filter.Filter is 'Red Channel' and Gradient is Bottom to Top Gradient and therefore the Gradient is visible moving upwards from darker pixels to brighter pixels in the Pattern which is Randomize where the filter is applied randomly.Pattern Style is Bottom Graph,so the Randomize Pattern is inserted into Bottom Graph.The Filter Style and Gradient is set to 'None' to exclude it while applying the filter.Also,Edit Mode is set to the Default 'Overwrite Mode' to exclude the Edit Mode feature and 3D Effect is disable from the 'Process' menu while applying the filter.Graphic Designers will realize how much complex and difficult this implementation is because the 'Red Channel' filter is randomly applied in the Graph and still it generates the Gradient.This is the most special combination where the Pattern is 'Randomize' and any other Pattern Style along with the Gradient will generate a Gradient even though the filter is applied randomly to the image.In this example,four features from different levels are combined to get a new 'Effect' i.e.,Filter+Pattern+Pattern Style+Gradient.
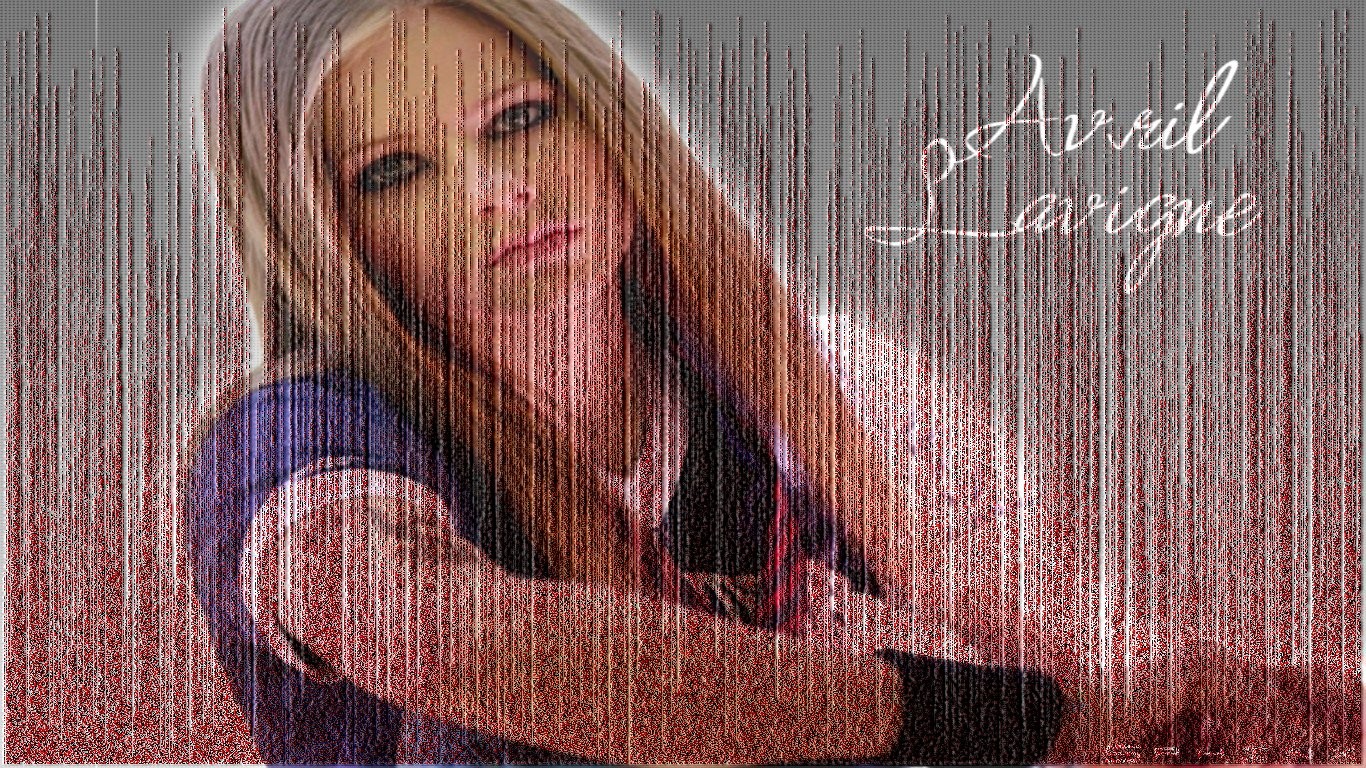
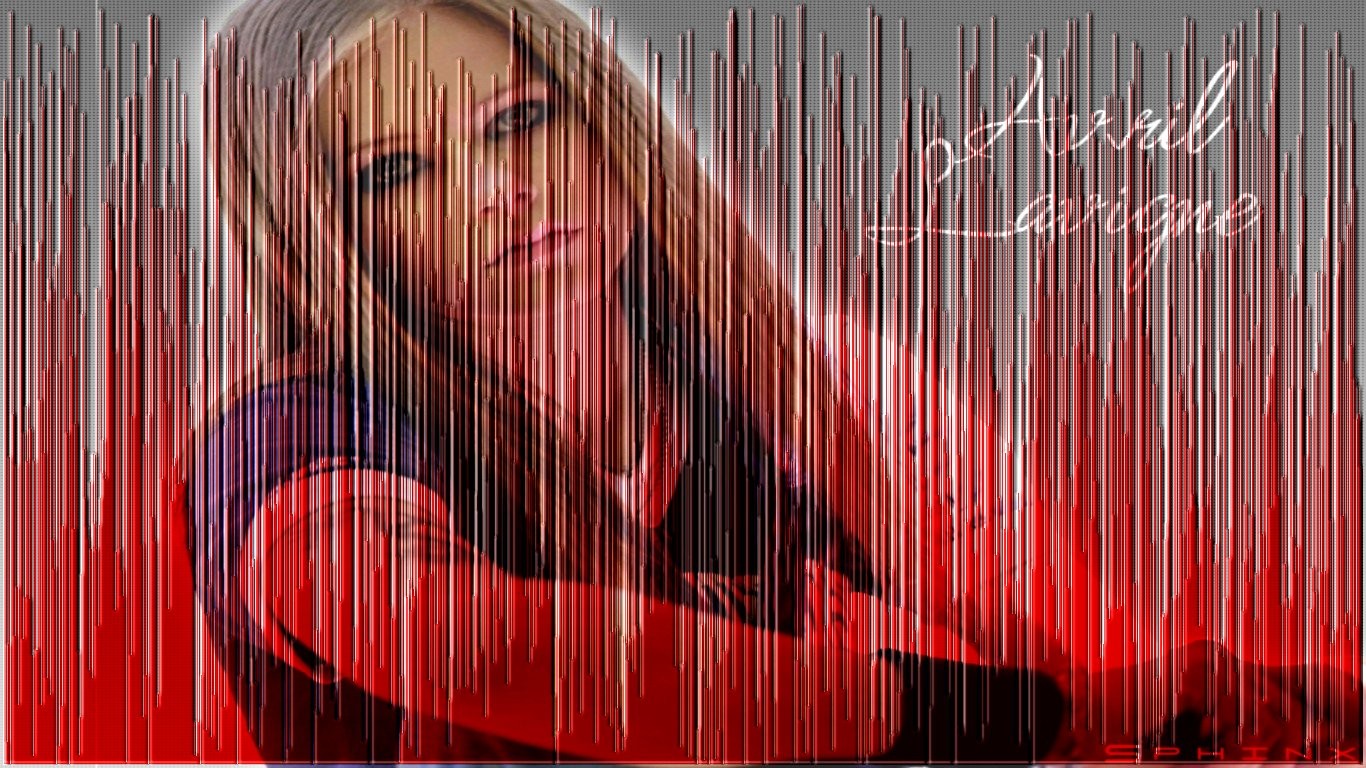
[Example 14] Following snapshot shows the Filter combined with QRGB,Gradient and Edit Mode and Pattern,Pattern Style,Filter Style and 3D Effect are not included while applying the Filter.This example is using Transparency Edit Mode and Transparency is set to 50 %.The Filter 'Opaque Textures' is applied the Red Gradient because in the QRGB panel the QRGB settings are R = 200,G = -200,B = -200 emphasizing the Red color in the Gradient.Textures filter is Opaque but because of the Transparency Edit Mode,Textures filter with Red Gradient is transparently merged with the image of 'Girl'.Pattern,Pattern Style,Filter Style and 3D Effect are disabled and excluded while applying the filter.Effect is similar to Gradient of Transparency but actually is not the Gradient of Transparency.
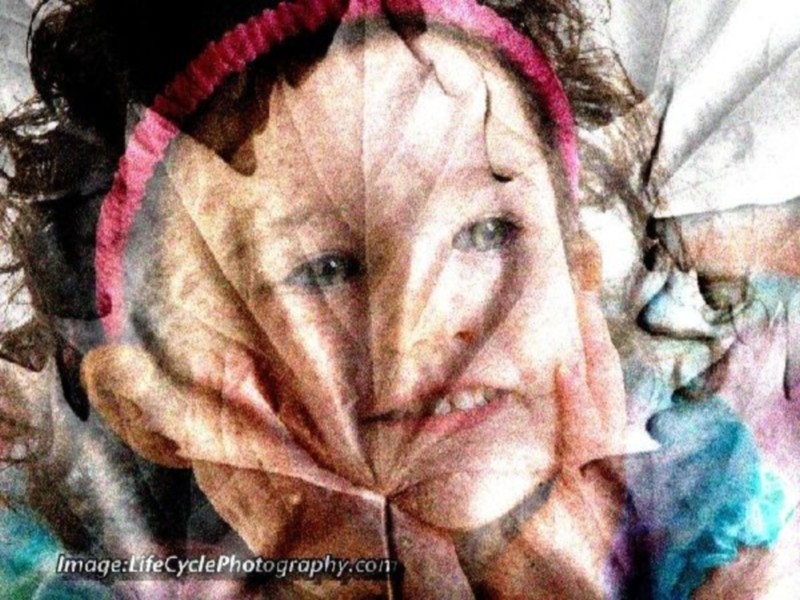
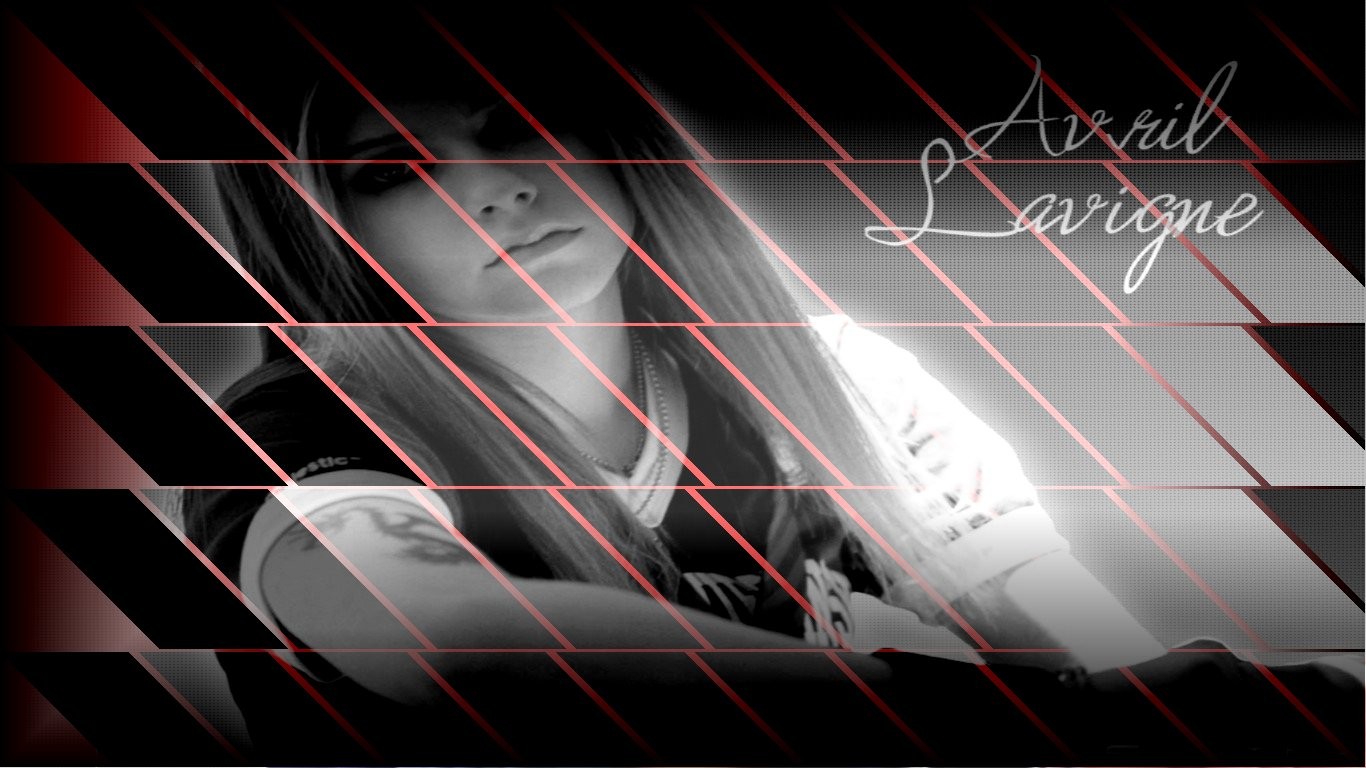
[Example 15] Following snapshot shows the Filter combined with Gradient,Edit Mode and 3D Effect and QRGB,Pattern,Pattern Style and Filter Style are not included while applying the Filter.This example is using Transparency Edit Mode and Transparency is set to 50 %.Textures filter is Opaque but because of the Transparency Edit Mode,Textures filter with 3D Effect is transparently merged with the image of Laetitiacasta.QRGB,Pattern,Pattern Style and Filter Style are disabled and excluded while applying the filter.Effect is similar to Gradient of Transparency but actually is not the Gradient of Transparency. 3D effect is also enabled,so the texture of 'Leaves' is also has the 3D Characteristics like 'Buttonize','Elevation' and 'Depth'.
[Example 16] Following snapshot shows the Filter being used with 3D Effect only and QRGB,Pattern,Pattern Style,Filter Style,Gradient and Edit Mode are not included while applying the Filter.This example also shows how much easy it is to create 'Standard Banners' in the Lobster application.

[Example 17] Following snapshot shows the Filter being used with Pattern,Edit Mode and 3D Effect and QRGB,Pattern Style,Filter Style and Gradient are not included while applying the Filter.First,'Big Rectangle'is added with the 'Darkness' filter and then 'Rectangles' are added to the image and then 'Transparency Edit Mode' is enabled from the 'Process' menu.Then,'Flowers.jpg' image is laid over the 'Rectangles'.Because,the 'Transparency Edit Mode' is used,the 'Flowers.jpg' is transparently merged with the underlaying 'Rectangles' Pattern.Also,the 3D Effect is enabled so both the Rectangles Pattern and 'Flowers.jpg' image inherent the 3D Effect characteristics.

[Example 18]
Following snapshot shows the Filter used with Gradient and 3D Effect while QRGB,Pattern,Pattern Style,Filter Style and Edit Mode are excluded from the filtering.Filter is 'Brightness' and 'Left to Right Gradient' is used in this example which is also adding text to the image.There are many innovative things in this example so we will go step by step :-
1>Line 1 is having a very innnovative 'Raised Bevel to Lower Bevel' gradient because of the 3D Effect and 'Left to Right Gradient'.In 3D Effect,all the brighter pixels will get 'Lower Bevel' Effect which means 'Depth' while the darker pixels will get 'Raised Bevel' effect which means 'Elevation'.Because of the Left to Right Gradient,gradient moves from the darker pixels to brighter pixels and hence a 'Raised Bevel to Lower Bevel Gradient' is created in the background of the text.User will also notice two gradients one inside the text moving from darker pixels to brighter pixels and another gradient moving from brighter pixels to darker pixels in the background of the text.
2>Line 2 creates a 'Raised Bevel to Lower Bevel Gradient' as the gradient moves from the brighter pixels to the darker pixels and 3D Effect but this time,there is a another 3d technique.'
3>Line 3 also has 3D efffect added to the text but this time there is no background color or filter and no gradient applied.
4>3D Effect and Gradient enabled but this time there is a 'Circular Gradient' instead of 'Left to Right Gradient'.
All the above examples proves how much powerful the 'Interface' of the Lobster applicaton really is.It also proves that by combining various features at various levels,the user can actually create thousands and thousands of 'Effects'.Only single advice is that the 'Interface' create 'Infinite Possibilities',so it is also possible that there will be certain times when the user will also get some distortions.In those cases,user should just change the Filter or QRGB settings or Pattern or Pattern Style or Filter Style or Filter Style or Gradient or Edit Mode or 3D Effect technique.If the user understands all the features of the Lobster application and Interface properly,then the user will actually agree that this really is the most powerful image editor in the world.